MyTajGarage.com
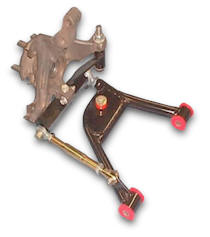
The suspension package is from HT Motorsports. The wide-track suspension package features tubular upper and lower control arms with adjustable coil-over shocks and urethane bushings. The front suspension was widened by 2" and the rear suspension was widened by 3" on each side. No wheel spacers here! I also got the Fiero axles widened by HT Motorsports. I took the axles to the local mechanic and had them mated to rebuilt CV joints. The coil-overs are rated at 350 for both front and rear. We'll see if they are too stiff for highway driving in such a light car. They also talked me into getting the bump steer upgrade option. Here's the pic.
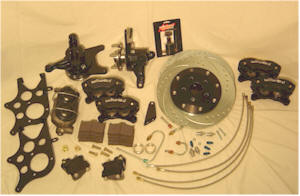
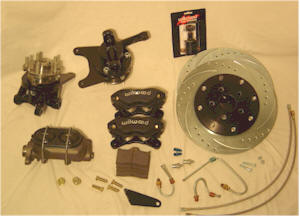
The brakes are 13" cross drilled and slotted with four piston Wilwood calipers. The kit also comes with new spindles, a larger master cylinder and stainless steel brake lines. NAERC supplied a Brembo logo which will be displayed on the caliper to match the original Lambo.
Here is the installed wheel assembly for the front suspension. I bought an air lift kit from NAERC. It actually came from www.airbagit.com. Notice the billet lift assembly in the left picture. I also got some Brembo decals with the kit. They look great. We'll see how long they last.
Here is the entire wheel assembly installed. NAERC calls for the front wheel well to be 24 5/8" from floor to fender at the center of the wheel. We are right on. It also calls for the wheel to be centered within a 29" opening horizontally. So, the center of the wheel should be 14 1/2" inches from each side on center. I got it as close as I could. This is actually how the entire is body is centered on the chassis. 9/26/09: I upgraded the front sway bar to a 1" Addco kit with urethane bushings. I bought it on eBay with a "make offer" bid. Maybe that was my first mistake... I thought this was going to be a simple bolt-in unit. Just remove the old brackets and bolt in the replacement parts, how long could that take?! Well, it took way too long. First off, the trunk of the car would not let the sway bar flush against the chassis. That was my mistake. Then I noticed the brackets did not match the bolt holes of the original sway bar. So, I heated the brand new brackets carefully and molded them into shape (with a hammer and bench vise). After several hours, everything fit. So I painted the brackets and bolted everything in place. I'm not sure if all Addco brackets for the Fiero are this way, but I would not go with them again. Try out Fiero Store or West Coast Fiero and see what they have. Something that should have taken 30 minutes ended up taking hours. It didn't take much research to decide that the 18" front tires would need some assistance to make those sharp turns. I decide to go with a '85 Chevy Chevette power steering rack. A couple of other builders have done with same with good success. Mounting only required moving one of the original mounts. However, in order to connect the Chevette rack to the Fiero steering column, I had to purchase a universal joint from Flaming River. I mounted a remote power steering pump on the motor by fabricating a new bracket. Since I widened the front suspension and the Chevette rack is shorter than the Fiero rack, I had a 7 1/2" tie rod extension made for the one side. Check out the pics below.
| |


